Create A Cool Looking Hip Hop Album Cover
Step 1: Creating the document
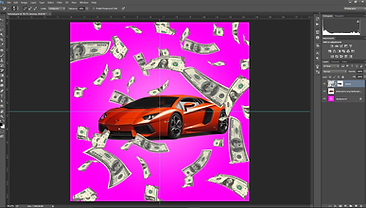
In this tutorial you will learn how to easily create your own hip hop album cover. We will add a Lamborghini and a Lot of money. Lets get started

First, in the top corner go to “File > New”. Once the little window pops up set your “Preset” to “Custom”. Now set your “Width” and “Height” both to “1600 pixels”. Also set your “Resolution” to “300” and click “OK”. Your document should be created
Quick Tip
If you click the letter "V" on your keyboard it will automatically select the move tool.
Step 2: Finding the center of your document
If the rulers aren’t available, then go to “View > Rulers” or press “Ctrl+R”. On to the background, go to the edge of your composition and click and drag the ruler out. This should make a straight line appear. Keep dragging it until it reaches the middle. The line should snap in the middle when you get close. Do this for both vertical and horizontal lines. Now you should have two lines intersecting in the middle of your composition.


Step 3: Selecting your colors for the background
We want to create a nice smooth one colour background. To do this select the “Gradient Tool” and go to the “Gradient Picker” in the top corner. Now select the first gradient preset. This should have only two colours for you to select. Under “Smoothness” there should be a big rectangle with a preview of the gradient. There should also be four buttons on each corner. Click the bottom left button and select the “Color” box. Now you can select the colour you want your background to be. Once you finished click “OK” and now select the bottom right button and again change the colour to the exact same one you chose for the bottom left button just slightly lighter. This will make the background gradually darken from the middle outwards. Once you have selected the slightly lighter colour press “OK” and then “OK” again to exit the window
At the top left corner there should be some gradient options. Make sure you have “Radial Gradient” selected (The second option). Now all you have to do it click and drag from the middle of your composition to the edge. The more you drag the bigger your radius will get.

Step 4: Applying the gradient
Step 5: Adding images

Now we want to add some images to make our album cover more interesting. We are going to add a Lamborghini in the middle of our album cover. To download the Lamborghini image click here. Now that you have downloaded it find it in your file explorer and drag it into our composition. The Lamborghini should have a transparent background. Resize it so its slightly smaller but position it in the middle. Once you are happy with the position and size press enter. Time to add in the money. Same as the Lamborghini just drag and drop. The background should also be transparent. To download the money file click here

To give a sense of depth between the Lamborghini and the money we need to make sure the small dollar bills are behind the Lamborghini and the big ones are in front of it since they are nearer to the camera. To do this we create a mask on the money layer. With the mask selected, select the brush tool and have black as your foreground colour (Black removes the part you paint) and white as your background colour (white paints back in the area of your image). You can switch between foreground colour and background colour using the keyboard shortcut “X”. Now just paint black inside the Lamborghini. This will delete the parts of the dollar bills that are in front of the Lamborghini and will make it look like its behind it. Make sure you only delete the small dollar bills. You can leave a bit of edges from the big dollar bills on top of your Lamborghini to give it a more realistic look. Just make sure your Lamborghini is visible.


In this tutorial you will learn how to easily remove the background from your subject even when the hair is tricky

In this tutorials you will learn how to add smoke to anything and also change the color of the smoke
More Tutorials
Step 5: Adding a 3D look
Step 6: Shadows

We need to add the shadows of the money to give it a realistic look and give the illusion of ground and air. To do this drag the money picture into Photoshop again and click “Enter” to apply. Now while holding down “Ctrl” click on the thumbnail of the money layer you just imported. This should create a selection around your money bills. Now press “Alt+Delete”. This should make your dollar bills black. If not then the layer needs to be rasterized. You can just click into your composition and it should ask you if you want to rasterize the layer and click “Yes”. Once your dollar bills have turned black press “Ctrl+D” to deselect the layer and decrease the opacity of the layer to give it a grey look (About 30%). Now press “Ctrl+T” to show transformation tools and while holding down “Ctrl” click and drag the top middle point down halfway through your Lamborghini and press “Enter”. This should distort your shadow layer. Now with your black dollar bills layer selected go to “Filter > Blur > Gaussian Blur”. Set the pixels to 7.5. This should give it a more realistic shadow look. Make sure your shadow layer is under the Lamborghini layer so the shadow goes behind the Lamborghini.

Step 7: Adding text

Select the “Type Tool” and click on the top of your composition. Now type the title of your album cover it can be anything you want. Once you are finished typing your title select it and at the top you can change size, font, and color of your text. Place your title at the top of your cover art. You can move positions of your title by selecting the “Move Tool”. With your title layer selected press “Ctrl+J” to duplicate the layer. Select the type tool and double click your duplicated layer. Now you can write the name of the artist without having to reselect the font and color. Move it to the bottom of your album cover. You can also add a drop shadow to your text to make it stand out and become easy to read. You can do this by double clicking your text layer. A menu should appear with different effects. Play around with it and see what you can achieve. And there you have it your very own album cover.

