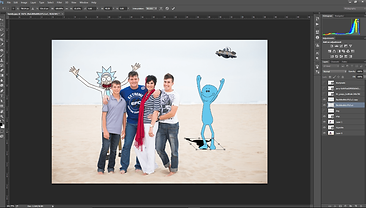
Rick and Morty Family Photo in Photoshop CS6
Add "Rick and Morty" characters in your family photo and blend them in to make them look part of the photo in Photoshop CS6

Locate and drag the family photo you want to add characters to into Photohop
Quick Tip
If you click the letter "V" on your keyboard it will automatically select the move tool.
Step 2
Now drag the characters you want to add into Photoshop. If your characters are in a ".png" format that means that they will have a transparent background. If however your characters are in a ".jpeg" format that means they will have a background and you will have to remove it. Click here to see how to easily remove background in Photoshop


Step 3
Now that you have added your characters and removed the background its time to add "Rick" behind the family. To do this you need to create a layer with only the family in it. You will need to create a selection around the family and then duplicate just your selection by pressing "Ctrl + J". Now when you drag your "Rick" into the composition but make sure you put him behind the family layer you just created
Time to add the shadows to make the characters look part of the scene. You will have to add a shadow separately for each character. Firstly you need to duplicate the layer you want to add a shadow to. Then create an active selection surrounding your character on whichever layer you want. To do this quickly just click the thumbnail of your character layer while holding down the "Ctrl" key. This should create an active selection surrounding your character. Now use the shortcut "Alt + Delete" to fill your selection with black ( Which should be your foreground color)

Step 4
Step 5
Once you have a black silhoutte of your character you need to place that layer behind your character. Bring up the transform tools by pressing "Ctrl + T" and while holding down "Ctrl" drag the points to distort your image. Once you are happy with your shadow placement decrease the opacity of your shadow to 40%. This will make it look more realistic

To make the shadow even more realistic we are going to add a blur. To do this hot to "Filter > Blur > Gaussian Blur". You can decide how many pixels you want to blur it by. Once you are happy click "OK". To increase the layer space we are going to merge the shadow layer with the appropriate character layer. Repeat steps 4-6 for each character.
More Tutorials
Step 6
Step 7

Press the shortcut key
"Ctrl + Shift + Alt + E" to create a copy of your image.To blend the whole image together and make it look better we are going to bring up the camera raw filter window. To do this you go to "Filter > Camera Raw Filter". You can play around with all the sliders to see what each of them does. Once you are happy with your image you can press "OK" and there you have it
Step 1

